How to use the SpaNet™ Control System on Vortex™ and Fisher™ Spas

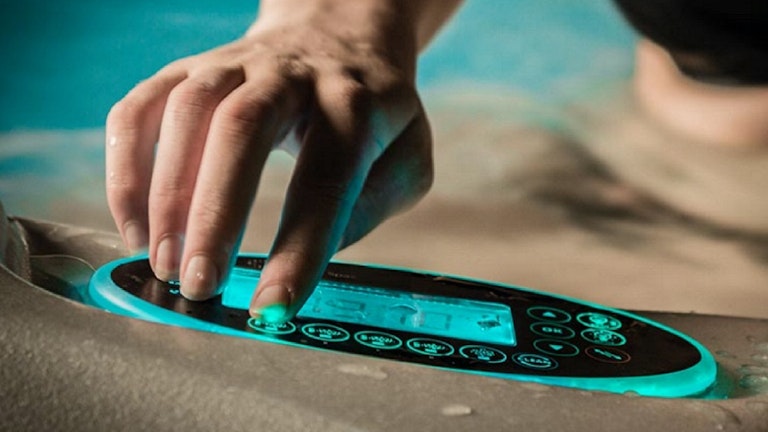
One of the first things you’ll need to learn with a new spa is how to control the keypad. This article will guide you on how to use the SpaNet™ controllers in Vortex™ and Fisher™ Spas.

SpaNet Error Code

This article explains the different buttons, functions, and features of SpaNet™ controllers, so you can get the most out of your Vortex™ or Fisher™ Spa.

In this article, you will learn:

This article mentions SpaNet™, which is not affiliated with Spa World™ or Vortex™ Leisure Pty Ltd. You can see the details about this brand at the bottom of this article.

Disclaimer: A licensed electrician must carry out all electrical work on your spa. Any electrical information included here, whether it is troubleshooting or other instructions, are provided for use by a licensed electrician only. Local electrical codes supersede any information found here.
What is the SpaNet™ keypad?

SpaNet™ is a leading manufacturer of controllers used by some of the top spa brands. Vortex™ and Fisher Spas™ are equipped with SpaNet™ keypads.

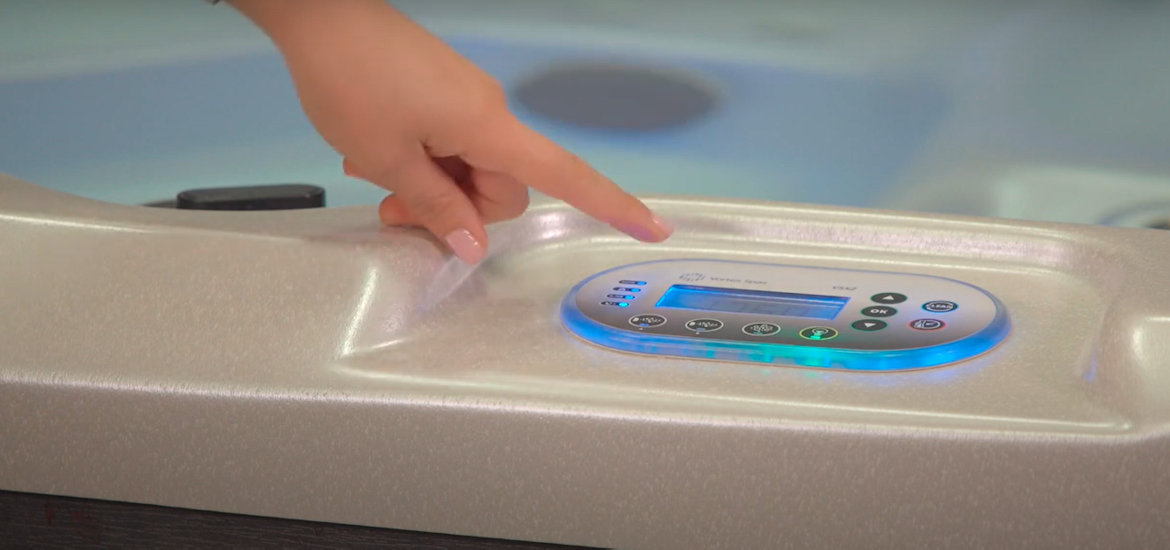
The SpaNet™ keypad is where you can control the main features of your spa, such as the clean cycle, lighting, and filtration. We will go through the main keypad functions below, so you can start to familiarise yourself with the SpaNet™ controllers.

Keep reading to learn how to decide which SpaNet™ controller you have.

Determining the model of your SpaNet™ controller

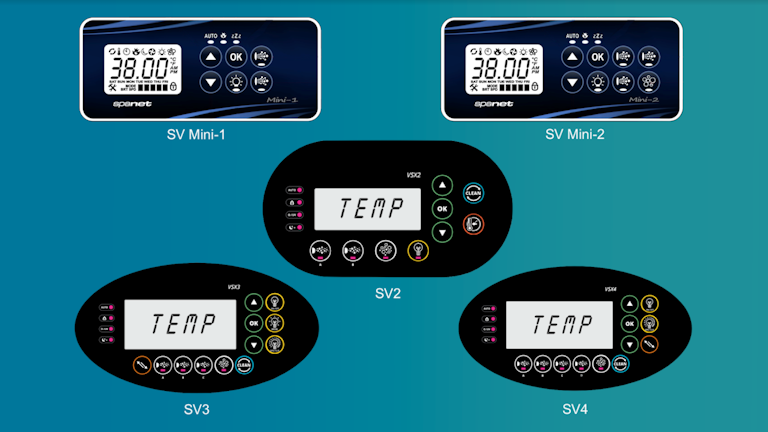
To determine the model of your SpaNet™ controllers, you can check the tech sheet for your spa. You should be able to identify the controller model from the descriptions there. Note that the SV1 is distinctive, but the other three models are similar.

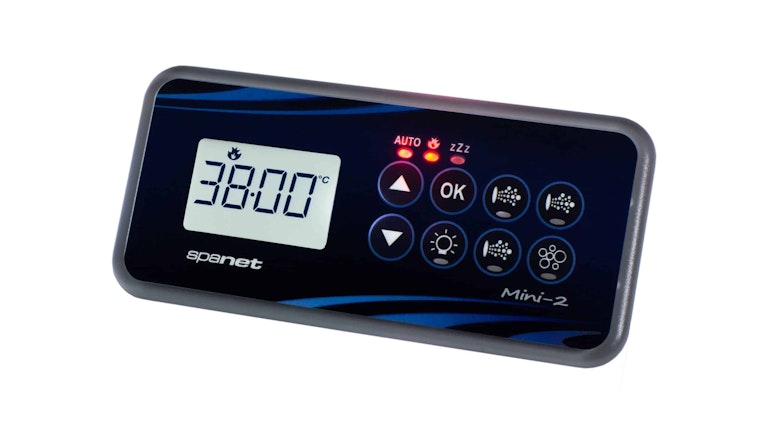
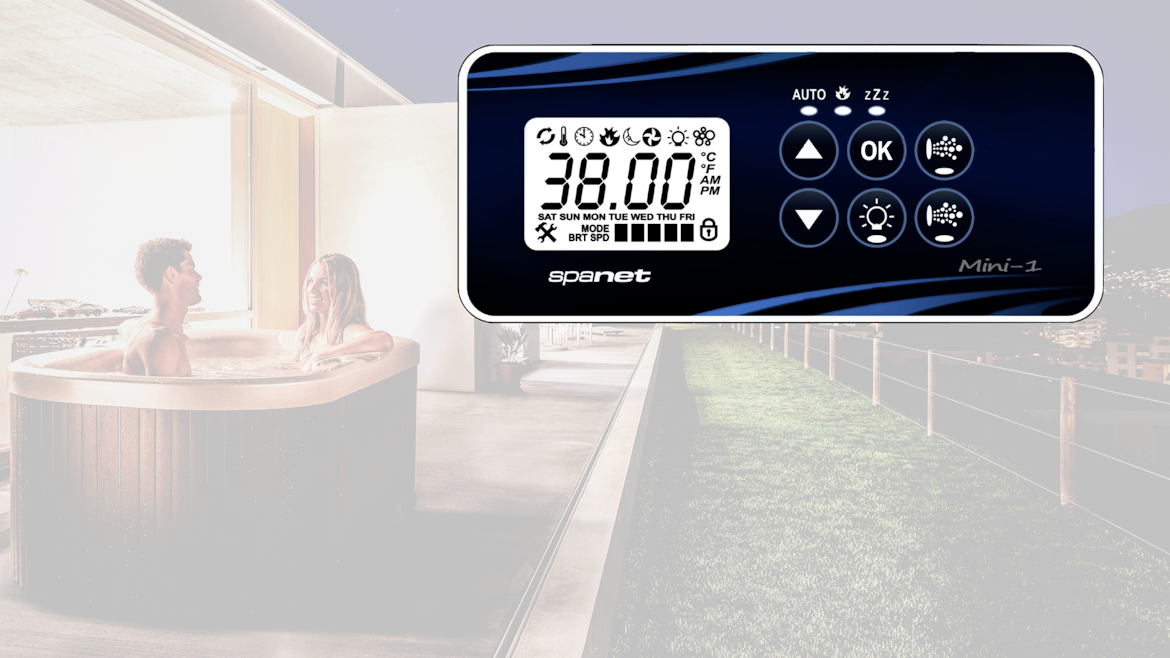
SpaNet™ SV1 Mini Controller

Spa controls

SpaNet™ SV1 Mini Controller

SpaNet™ SV2 Mini Controller

Spanet SV2 mini controller

SpaNet™ SV2 Mini Controller

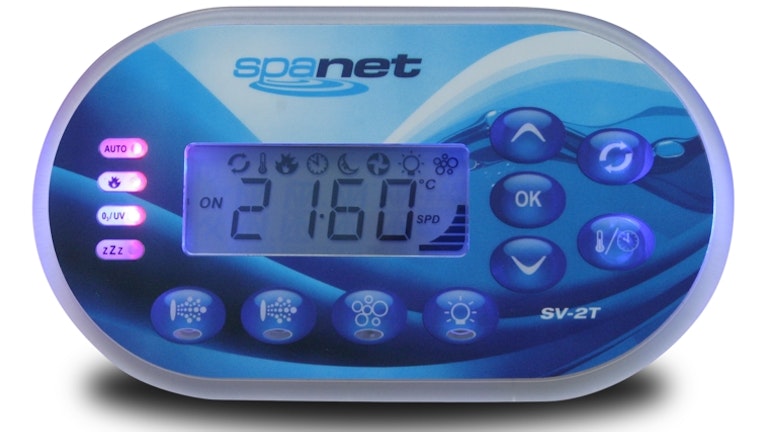
SpaNet™ SV2 Controller

SpaNet SV2 Controller

SpaNet™ SV2 Controller

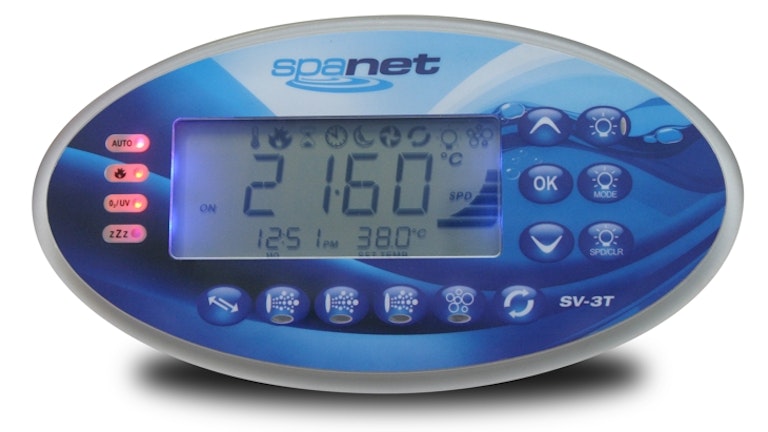
SpaNet™ SV3 Controller

SpaNet SV3 Controller

SpaNet™ SV3 Controller

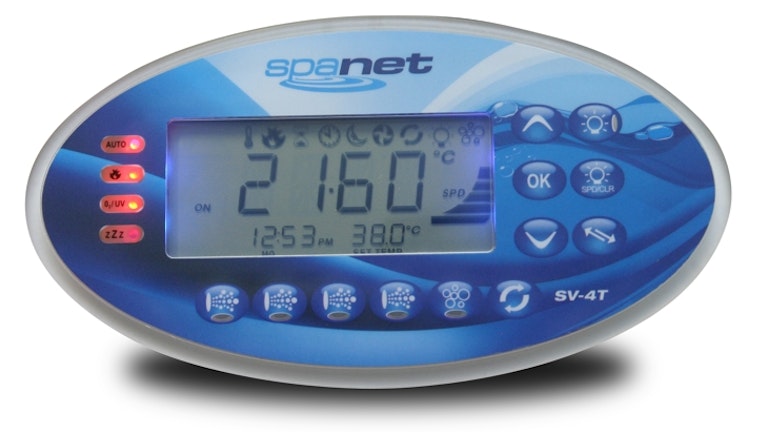
SpaNet™ SV 4 Controller

SpaNet SV 4 Controller

SpaNet™ SV 4 Controller

While the SV2, SV3, and SV4 are similar to the SV1 and SV2 Minis they have extra functions and features that set them apart.

The main way to tell the different models apart, is by the number of pump buttons on the keyboard:

  • SV1 Mini - 1 pump button
  • SV Mini 2 - 2 pump buttons
  • SV2 - 2 pump buttons
  • SV3 - 3 pump buttons
  • SV4 - 4 pump buttons

Once you understand the meaning behind each button and indicator on the keypad, using it is pretty straightforward.

Watch: How to use SpaNet™ SV Mini 1 keypad (Step-by-step)

What are the buttons on the SpaNet™ SV1 & SV2 Mini keypad?

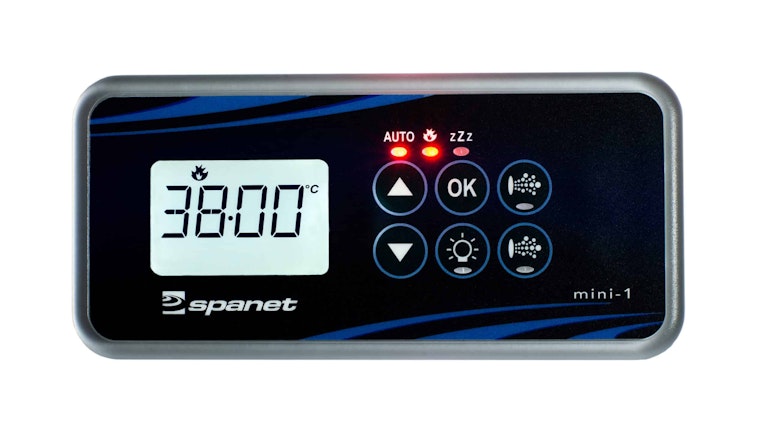
Let’s go through the buttons and the indicators that can be found on the SV1 keypad. This is the keypad commonly found on Vortex™ Spas.

  • Up and Down
  • Ok
  • Pump A
  • Auxillary
  • On/Off light
  • Auto Mode LED
  • Heater On LED
  • Sleep Cycle LED
jetted hot tub

Up, Down, and Ok

These buttons are used for selecting the desired settings. The Up and Down buttons are for going through the different options while the Ok is for picking the correct option.

Pump A

This button is the main difference between the SV1 keypad from the other SV controllers. Other models have multiple pump buttons.

Light indicators

The buttons for the pumps and lights will be lit with a green LED light within the circle of the button to indicate when the corresponding functions are on. The LED indicators at the top will light up in red to indicate the spa's status.

Auto Mode LED

The Auto Mode LED will turn on when the spa is in automatic filtration mode. It indicates that the pump used for filtration will turn on and off to meet the spa's filtration and heating requirements.

Should the filtration pump be turned on or off manually, the Auto Mode LED will turn off.

The control will revert to Auto Mode after 45 minutes if it is not changed back to Auto Mode.

Heater ON LED

The Heater On LED will turn on when the heater is active. Keep in mind that the heater is automatically controlled. It will turn on and off as needed. It will work with the filtration pump to maintain the set temperature.

When the filtration pump is turned off manually, the heater will not operate.

Take note as well that in some cases, activating high speed on a 2-speed pump or running multiple pumps may cause the heater to turn off. That is needed to keep the system within a correctly rated power supply. That will occur even if heating is required.

Sleep Cycle LED

The Sleep Cycle LED will turn on when the spa is within a designated sleep cycle. When the Sleep Cycle is activated, all automatic system activation will stop.

Remember that filtration and heating will not occur during a sleep cycle.

SV2 keypad

Setting the Clock

Important functions like filtration require the date on the display. Make sure that the date and time on the display are correct. To do that, press the Down button to select the time on the display. Then press Ok once you have made the selection.

The required adjustments will appear based on:

  • Time (24-hour, 12-hour)
  • Year
  • Month
  • Date
  • Weekday
  • Hours
  • Minutes

Again, you only need to use the Up, Down, and Ok buttons to make the adjustments. Once you are done, the display will go back to the default display mode.

Reminders

The SV1 can factor in leap years, but it doesn’t consider daylight savings time. This means you must adjust the settings manually.

If there is a power interruption, the SV1 can hold the correct clock setting for eight to 10 hours. The clock will have to be manually set if the power is not restored after that period.

These are the most commonly used functions of the SV1. Please go through your instruction manual for more details on using the keypad properly and to learn more about the other features of your Vortex™ Spa.

Watch: How to use SpaNet™ SV2 keypad on a Vortex Spa

How to use the SpaNet™ SV2, SV3, and SV4 controllers

If your spa has the SpaNet™ SV2, SV3 or SV4 controller it is set up a little differently to the SV2 keypad.

The following buttons and indicators are found on the SpaNet™ SV2, SV3 and SV4 keypads are:

  • Up and Down
  • Ok
  • Sanitise
  • Water Temperature and Time
  • Light
  • Blower
  • Pump A
  • Pump B
  • Pump C
  • Sleep Timer Indicator LED
  • Sanitiser Indicator LED
  • Heater Indicator LED
  • Automatic Indicator LED

We look into the function of those buttons and indicators in detail below.

Premium SpaNet Controller

Up, Down, and Ok

The Up, Down, and Ok buttons are for entering and saving setting adjustments.

Sanitise

The Sanitise button is used to activate a 20-minute sanitisation action. This is to refresh the water quality after the spa has been used. Another press of the button will cancel the cycle.

Water temperature and time

The Water Temperature and Time button is a shortcut. You can switch between water temperature and time display modes using the button. This makes it easier to check the temperature or the time left.

Changing the light colours

The Light button gives you control over the lights of your spa. To change the light mode, press the Light button and then use the Up and Down buttons to choose the light mode.

The light modes are:

  • White
  • User colour
  • Fade effect
  • Step effect

Once you have picked the light mode of your choice, press the Ok button. You may be given additional mode options depending on your selected original mode.

These additional options include:

  • User colour number
  • Transition speed
  • Light brightness

Remember that the light settings are saved, so you don’t have to repeat the same process.

Blower

Use the Blower button to turn on and off the blower; you just need to give it a single press. You can then use the Up and Down buttons to control the speed of the blower. You may be given additional mode options depending on your selected original mode. Use the same process for selecting your choice.

Pump A

This button is used for controlling the filtration pump. Remember that this might differ when using a spa with an SV3 or an SV4 controller.

Pump B

The Pump B button is used for controlling the jet pump. On the SV3 or SV4, there will be additional pump buttons.

Sleep timer indicator LED

This LED indicator will turn on when the controller is in sleep mode.

Sanitiser indicator LED

This indicator will light up when the ozone or the UV sanitiser is operating.

Heater indicator LED

This LED indicator will turn on when the heater or the heat pump is running.

Automatic indicator LED

This indicator will run when the filtration pump is running in automatic mode.

How to lock the SpaNet™ SV keypad (All models)

To lock the keypad, you need to press the Up and Down and then the Pump A buttons. A lock icon should appear on the display screen as confirmation. When the keypad is locked, none of the functions will run even when buttons are pressed. To unlock the keypad, press the same three buttons simultaneously.

You can also partially lock the keypad. To partially lock the spa, press the Up and Down buttons and the pump B button. The lock icon will also appear on the screen. Only certain buttons will be usable under this mode. To remove the partially lock mode, press down on the same three buttons.

SV Controllers

How to setup your spa using the SpaNet™ SV controller

The setup menu of your spa will give you the chance to customise its adjustable controller settings. To start and adjust, press and hold the Up and Down buttons simultaneously until Mode shows up on the screen.

Use the Up and Down buttons to scroll through the available options, and then press Ok when you have the option on the screen.

All the items on the setup menu follow the same procedure for the setup. Now, we’ll go through the different menu items there:

Operating Modes

The following are the operating modes that you can adjust:

  • Normal
  • Away
  • Week

Normal mode is for normal heating and filtration. Away means that the heating is disabled, and the filtration is reduced to one hour per day.

Week mode is a weekly schedule where the spa goes on Away mode from Monday to Thursday and then runs on Normal mode from Friday to Sunday.

Filtration

You can adjust the hour of the daily filtration. Just remember, the filtration limits depend on the type of pump installed in your spa.

You can adjust the hours of filtration each day. The filtration limits depend on the type of pump. Circulation pumps rated at 2 Amps or less can be adjusted between one to 24 hours. Jet pumps, one speed or two speed, can be adjusted between one to eight hours.

purezone filtration system

Filtration Cycles

This setting is used for determining how often filtration cycles will take place. The following are the filtration cycle options:

  • 1 Hour
  • 2 Hours
  • 3 Hours
  • 4 Hours
  • 6 Hours
  • 8 Hours
  • 12 Hours
  • 24 Hours

Sleep Timers

The Sleep Timer function is used to disable the automatic heating and filtration of the spa at certain times. You have four options:

  • Sleep timer 1
  • Sleep timer 2
  • Reset timer to default
  • Exit timer menu

The two timers will allow you to create two different sleep settings for different days.

For example, you can create a weekday setting, start, and stop time. When creating the setting, the option would appear on the screen as day, begin, and end. As with the other settings, you can use the Up, Down, and Ok buttons to adjust and confirm your chosen settings.

How to disable the sleep timer

Steps to Disable Sleep Timer on SpaNet™ controllers:

  • Press and hold UP and DOWN buttons simultaneously until [MODE] is displayed.
  • Press the DOWN button to skip through menu items until [SNZE] is displayed
  • Press the OK button to enter SNZE adjustment,[1.SNZ] is displayed.
  • Press the OK button to enter 1.SNZ (first sleep timer) programming
  • Press the UP or DOWN button to adjust 1.DAY setting until the semicolon [:] OFF
  • sleep timer icon is displayed.
  • Press OK to confirm and save settings
  • Re-enter SNZE menu and ensure 2.SNZ (second sleep timer 0 is also disabled [:]

Power Save Off-Peak

Because the power consumption of the spa can be considerable, the SV2 controller has the Power Save Off-Peak setting. This allows you to set the spa functions like heating and filtration to occur during off-peak power periods.

There is three power save options:

  • Off
  • Low
  • High

The Low setting means off-peak filtration only. High means filtration and heating. You must enter the peak power period to schedule when the Power Save mode should activate.

You can enter the beginning of the peak power time and the end peak power time. You can adjust the 20-minute daily sanitiser to any hour of the day from 0:00 to 11:59.

power meter

Default Display Mode

The Default Display would normally show on the keypad's display on normal operations. You can adjust the default display to the following options:

  • Water temperature
  • Set temperature
  • Clock

Time Out

The pumps and blowers of the spa will automatically turn off after the Time Out period. **You can adjust the Time Out Period from ten to sixty minutes. **

SpaNet Integrated Heat Pump Interface

Hybrid Heat Pump Mode

This is an external upgrade to the spa. If you have this upgrade, the options for it are:

  • Auto
  • Heat & Cool
  • Heat
  • Cool
  • Off

What is SpaNet® SmartTouch™ Touchpad?

The SpaNet® SmartTouch™ Touchpad is a special control panel for spas. It has a 4.3-inch colour screen that you can touch to use, even if your fingers are wet. Unlike phone screens, it works well in bright sunlight and doesn't show fingerprints much.

SpaNet® SmartTouch™ is used on select 2024 manufactured Vortex™ Spas.

What are the buttons on the SpaNet™ SmartTouch™ Touchpad?

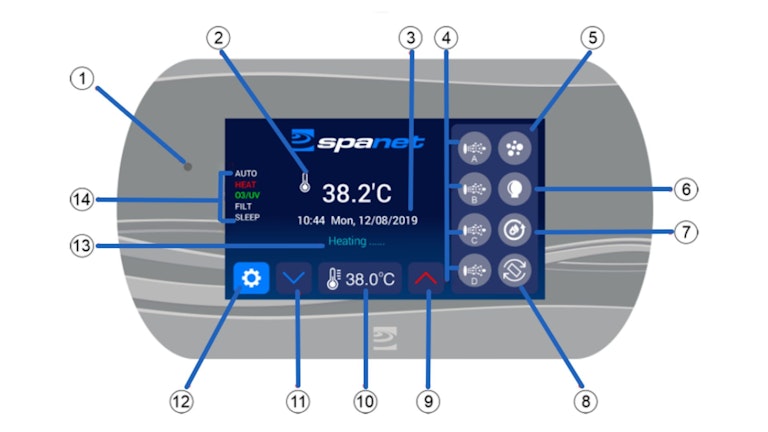
Unlike SpaNet™ SV2, SV3, and SV4 control panels, the SmartTouch™ home screen has more buttons. Let's explore them and get to know their functions.

smarttouch keypad buttons
  • Light Sensor. Detects ambient light and adjusts screen brightness for better visibility.
  • Water Temperature. Shows the current spa water temperature.
  • Time, Day and Date. Displays the current time, day, and date.
  • Pump Buttons (A, B, C, D). Controls for turning various spa pumps on and off.
  • Air Blower Button. Turns the air blower on and off, adding bubbles to the water.
  • Light Button. Turns the spa lights on and off and adjusts their settings.
  • Clean/Sanitise Cycle. Activates a cycle to clean and sanitise the water.
  • Invert/Flip Screen. Flips the touch panel display 180 degrees for easier viewing.
  • Increase Set Temperature. Raises the desired water temperature.
  • Set Temperature. Shows the target temperature for the spa water.
  • Decrease Set Temperature. Lowers the desired water temperature.
  • Settings. Accesses menu for adjusting spa settings.
  • Current Activity Scroll. Displays real-time updates on spa activities.
  • Status Indicators. Shows icons that indicate the status of various spa functions.

How does Automatic Heating and Filtration work in SmartTouch™?

SmartTouch™ uses intelligent software that monitors the spa water automatically adjusting the heater and filtration pump to maintain your set water temperature and required daily filtration.

The filtration pump maintains the set water temperature and the required daily filtration. The desired temperature can be set between 10°C and 41°C, with a default of 38°C.

Using set-and-forget technology, the system automatically controls heating and pumping to keep the set temperature.

How to adjust or set the temperature on a SmartTouch™

Adjusting the temperature is simple. On the home screen, simply press the up button to increase the water temperature and the down button to decrease.

Important reminders:

  • During a heating cycle, the SV control may raise the water temperature to 0.5°C above the set temperature point to provide an average water temperature of the set point most times.
  • If an optional heat pump is not fitted, the spa controller cannot cool the spa water. Lowering the set temperature will not begin cooling the water; the water will naturally dissipate heat over time.
  • If an optional heat pump is fitted, the spa water can be cooled and heated if the H.PMP mode is set to AUTO instead of HEAT (default) within the settings. If H.PMP is set to AUTO, lowering the set temperature point will engage a cooling cycle (when required) to maintain the desired set water temperature.
  • Suppose the spa control has been in standby mode (idle) for some time, and the set temperature point is adjusted. In that case, the filtration/circulation pump may run for up to ten (10) minutes to complete a mixing cycle before the heater/heat pump engages to heat or cool (heat pump only) the water. To skip this mixing cycle and begin heating/(cooling) immediately, cycle the filtration pump ON/OFF/AUTO.

How do pumps work in SmartTouch™?

The pump operation in SmartTouch™ can function automatically or be manually controlled via the pump buttons on the touch panel. Here's an overview of how it works:

Automatic Operation

  • The filtration pump will automatically switch on and off as needed to perform filtration and heating functions.
  • All pumps will also operate for a short period during the daily sanitise cycle to purge the pipes.

Manual Control

  • Pump A Button (multi-mode screens)
  • If the pump has multiple modes/speeds, pressing the Pump-A button will present a screen where the desired mode/speed can be selected.
  • For example, in the case of a 2-speed pump, you can select either low or high speed.
  • For variable speed pumps, the speed can be adjusted using the on-screen slider.

1-Speed Pump Buttons

  • Press the pump button once to turn the pump on, and press it again to turn it off.
  • The button icon will light up green when the pump is on and white when it is off.

Important reminders:

  • If left on, pumps will automatically turn off after 30 minutes of touch screen inactivity.
  • If the filtration pump is operating and the heater is on, turning the pump off will have a 5-second delay to allow the heater to cool down.
  • In some configurations, engaging the high speed of a 2-speed pump or operating multiple pumps may cause the heater to load shed and turn off to keep the system within its rated power supply.

How to operate air blower on a SmartTouch™

Not all spas come equipped with an air blower. If your spa does have one, you can use the blower button to choose the desired operating mode and adjust the blower speed.

The chosen speed is saved and will be restored the next time the blower is turned on for future use. There are two modes of operation: Variable Speed Mode and Ramping Mode.

To operate these modes, follow these steps:

Variable Speed Mode

  • Step 1. Press the air blower button on the touch panel to turn it on and access the blower settings.
  • Step 2. Press Variable Speed Mode
  • Step 3. Use the + or - buttons or the slider bar to adjust the blower speed to your desired level.
  • Step 4. Press the home icon to return to the main display. The screen will also timeout and revert to the home display after 30 seconds of inactivity.

Ramping Mode

  • Step 1. Press the air blower button on the touch panel to turn it on and access the blower settings.
  • Step 2. Select the ramping speed mode, which will adjust the blower speed in a ramping pattern.
  • Step 3. Press the home icon to return to the main display. The screen will also timeout and revert to the home display after 30 seconds of inactivity.

Important reminders:

  • The air blower button icon will light up green on the home display if the blower is on.
  • When the blower is first turned on, it will always run at maximum speed for 3-4 seconds before switching to a lower speed if a lower speed was set during the last use.
  • If left on, the blower will automatically turn off after 30 minutes of touchscreen inactivity.

How to operate the lighting features on a SmartTouch™?

The lighting features include multiple modes that allow you to adjust the light colour, effect mode, transition speed, and brightness.

Lighting Modes and Operation Instructions

The lighting features include multiple modes that allow you to adjust the light colour, effect mode, transition speed, and brightness. The settings are saved and will be restored the next time the light mode is turned on. The possible light modes are:

White Mode

  • Adjust the light brightness only.

User Colour Mode

  • Select from 30 possible colours using the right-hand slider.
  • Adjust light brightness using the left-hand slider.

Fade Effect

  • The light will fade through all possible colours.
  • Adjust the light effect transition speed using the right-hand slider.
  • Adjust light brightness using the left-hand slider.

Step Effect

  • The light will step through all possible colours.
  • Adjust the light effect transition speed using the right-hand slider.
  • Adjust light brightness using the left-hand slider.

Party Effect

  • The light will flash through all colours in a disco-like effect.
  • Adjust the light effect transition speed using the right-hand slider.
  • Adjust light brightness using the left-hand slider.

Important reminders:

  • Press the home icon to return to the main display, or wait for the screen to time out after 30 seconds of inactivity.
  • The light button icon will light up green on the home display if the light is on.
  • If left on, the light will automatically turn off after 45 minutes of touchscreen inactivity.

How to operate the sanitise cycle on a SmartTouch™?

To operate the sanitise (clean) cycle on a SmartTouch™, follow these steps:

Activating the Sanitise Cycle

  • Press the sanitise button on the home screen to activate the sanitise (clean) cycle.
  • This initiates a twenty (20) minute clean cycle that runs the filtration pump and ozone/UV (if fitted) to filter the pool water and refresh water quality.
  • If the spa is equipped with a circulation pump system, jet pump 1 will also run for the full duration of the 20-minute cycle.
  • For spas with 2-speed filtration pumps, the pump will run at high speed for the entire cycle.
  • Additionally, at the start and end of the cycle, the controller will sequentially run any additional pumps (pump 2, pump 3, pump 4 if fitted) and the blower for one minute each to purge the plumbing and clear any unfiltered water trapped in those lines.

Cancelling the Sanitise Cycle

  • Press the sanitise button again to cancel the cycle if desired.

Please note: At the end of the clean cycle, there is a brief delay before the pumps switch off as certain software maintenance tasks are being carried out. This is normal. At the end of the clean cycle, there is a brief delay before the pumps switch off as certain software maintenance tasks are being carried out. This is normal.

Automatic Daily Sanitise

  • The controller will automatically run a 10-minute sanitise cycle every day at a default time of 9:00 AM.
  • This automatic sanitise cycle works similarly to the manual sanitise cycle but runs for only 10 minutes.
  • This feature cannot be disabled; however, the start time can be changed via the Settings menu item W.CLN.

Please note: If the controller is in a programmed sleep period at the auto-sanitise start time, the sanitise cycle will wait until the sleep period ends before starting. If the touch panel is pressed before the auto daily sanitise cycle operates, the spa will be deemed used, and the cycle will be cancelled for the day.

How to lock the SmartTouch™ buttons

The SmartTouch™ buttons can be locked to prevent accidental presses or to restrict access to specific controller functions.

To lock the SmartTouch™ buttons, follow these steps:

Step 1: Enter the Menu Settings.

  • Press the Settings button on the touch panel to enter the settings menu.

Step 2: Select a Lock Option.

  • There are two lock settings you can choose from. The Partial Lock allows the use of the pumps, blower, and light but locks out temperature and settings adjustments. The Full Lock disables all touchscreen functions.
  • Use the up and down arrow buttons to scroll through the settings menu until you find the LOCK option.

Step 3: Activate the Desired Lock Option.

  • After selecting the desired lock option, press the OK button to confirm and activate the lock.

Unlocking the Screen

  • To unlock a locked SmartTouch™, press on a locked button, and the Enter Pin screen will appear.
  • Enter the unlock pin sequence: Press 1, 4, 7, 8, 9 (L-shaped pattern) and then press the ENTER button.

Element Boost

This mode enables or disables the SV electric element. It can boost the heat pump heating when the water temperature goes 2°C below the set temperature point. The Element Boost can also be used when the heat pump runs for more than an hour.

Putting in on Off will disable the element, and only the heat pump will be enabled. On will enable the SV element and the heat pump.

These are the most commonly used functions of the SV2 keypad. Please refer to your instruction manual for more details on using the keypad properly to get the most out of your Vortex™ Spa.

How to wire your SpaNet™ SV Series controller

Important: A licensed electrician must perform all electrical connections to comply with national and local connections. Wiring the controller is not an action the user should take unless he or she is a licensed electrician.

Spanet SV Series

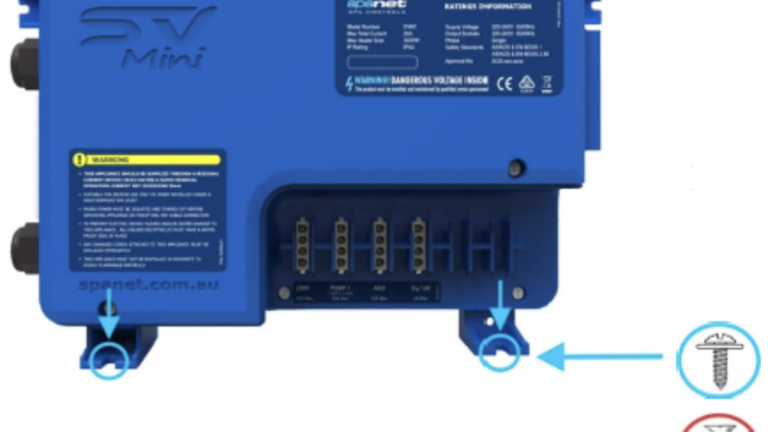
Use pan, round or truss head screws with flat washers to install the controller.

Sometimes, the SV Series controller of a spa may have to be replaced. This needs to be done by a professional.

First of all, the supply line should be a dedicated electrical circuit. The electrician must consider the power consumption of all the devices connected to the spa and install the correct circuit breaker.

Remember that the spa controller should be mounted vertically in a fixed position. You should only use pan, round or truss head screws with flat washers. DO NOT use countersunk screws since those can cause damage.

Please view the manual below for a more detailed guide on how to wire your controller.

How to adjust the daily ozone running time (O.MAX) on an SV Series™ spa controller

The daily ozone run time or O.MAX software setting defines a maximum number of hours the sanitiser (ozone/UV) can run for in a given day. By default O.MAX = NONE (disabled), so the sanitiser will run whenever the spa is heating or filtering with one exception: if the spa is in manual use, in which case it is temporarily disabled.

The O.MAX can be adjusted from 1‐23 hrs. This is helpful to prevent excessive ozone gas on smaller spas that may be set with many hours of filtration or larger spas that require long periods of heating.

Click the button below to view full instruction manual.

Why is the Ozone/UV not coming on when clean cycle is pressed?

The UV/Ozone has a maximum limit of hours that it stays on during the day, so if the clean cycle is pressed multiple times or after the max time the UV has been operating, then the light will not go on.

This does not affect the function and is normal setting on the controller.

How do I maintain spa touchpads?

Maintaining spa touchpads is crucial for ensuring the longevity and functionality of your spa controls.

Here's a simple and straightforward guide to keeping your spa touchpads in tip-top shape:

Keep it Clean

Regularly wipe down the touchpad with a soft, damp cloth to remove any dirt, grime, or residue that could build up over time. Avoid using harsh chemicals or abrasive materials, as they can damage the touchpad's surface or the electrical components underneath.

Gentle Use

Touchpads are designed to respond to a light touch. There's no need to press hard or use sharp objects on the touchpad, as this could cause scratches or damage to the sensitive control surface.

Avoid Water Submersion

While spa touchpads are water-resistant to withstand the occasional splash, they should not be submerged in water. Make sure to fix any leaks that could cause water to accumulate around the touchpad area.

Regular Checks

Periodically check for any signs of wear and tear, such as cracks or unresponsive areas on the touchpad. Early detection of issues can help prevent further damage and potentially costly repairs.

In summary

We hope this article has helped you understand how to use the SpaNet™ controls on your Vortex™ Spa. Knowing how to use your spa controller will ensure you get the most out of your spa and all its great features.

If you need more information on how to use your Vortex™ Spa, get in touch with our customer care team. You can also visit your local Spa World Showroom and talk to one of our friendly salespeople.

DISCLAIMER The following registered trademark is owned by companies not affiliated with Spa World™ or Vortex Leisure Pty Ltd – the parent company of Spa World Ltd. Spa World™.

Related Articles

Five Star Trust Pilot Rating

We are proud that Spa World customers have given us a Five Star Trustpilot rating.